lamechang-dev

Webフロントエンドエンジニア lamechangのブログ。

コワーキングスペースの土日プランを契約した話

コワーキングスペースを契約しました

家から自転車で10分弱程度のところにあるBIZcomfortを土日プランで契約しました。めちゃくちゃいいのでそれについてざっと書きます。

bizcomfort.jp

契約した理由3点

1.副業を再開するため

また本業と別のスタートアップのお手伝いを少しずつ再開することになったので、ガッと集中できる場所が欲しかった&安定したネットワーク環境が欲しかった、というのが一番の理由です。

まぁ、これがなくてもいつか契約したいとは思っていたのですが副業を再開することが背中を押しました😤

これまでは土日は午前中の時間を作業・勉強や副業に充てるようにしていたのですが、最近通っていた喫茶店(タリーズ)のWifiがめちゃくちゃ遅くなったのもあり(ちなみに私は土日に家で勉強や仕事は遊んでしまうので一切できません)、Google meetなどの会議が動画付きでろくにできないことに気づいて喫茶店での作業はもう諦めました。

2.感染対策

なんだかんだカフェは飲食店&みなさんめちゃくちゃ会話しているので、ちょっと飲食店に長居が怖いのもありました😤 コワーキングはみなさんマスクしていて静かですね。

3.めちゃくちゃコスパがいい

BIZcomfortについてですが、土日プランのコスパが本当に良すぎます。これはHPで料金見ていただければわかると思うのですが本当に良心的な値段です。

しかも自分が利用している拠点はなんとディスプレイついてて本当に助かります😿 どこもついてるのかな。あと最近個人事業主として開業したのもあって、経費にできることも考慮すると本当に安い。

また通うに際してちょっと遠いくらいの方が、通うのに軽い運動になっていいかな、と思ったのも契約した理由です。

終わりに

半年ほどは利用するのは間違いないので、またその際にレビューなどざっと書きます。

【TypeScript】レコード型とマップ型

はじめに

今回はTypeScriptにおいてObjectの型定義をしていく上で必須知識とも言っても過言ではないレコード型・マップ型についてです。花粉辛い。

レコード型

TypeScriptの組み込みのRecord 型は 、 あるものからあるものへのマップ(対応付け)としてオブジェクトを表現するための方法です。オブジェクトが特定のキー&バリューの集まりであることを強制するために Record 型は有用です。

以下のような記法を取ります。

type RockPaperScissors = "Rock" | "Paper" | "Scissors";

type Hoge = Record<RockPaperScissors, RockPaperScissors>;

const winTarget: Hoge = {
  Rock: "Scissors",
  Paper: "Rock",
  Scissors: "Paper",
};

類似の記法に インデックスシグネチャ があります。こちらも同様にオブジェクトの値の型を制約できますが、キーに採用できるのは stringnumber だけになりますね。例えば、上記の例で定義した 文字列リテラルのユニオン型である RockPaperScissors は キーに採用できません。エラーも、「代わりにmapped object type を使ってくれ」と言ってます。

このように、Record型のキーは、stringnumberのサブタイプであれば自由に制約をつけることができます。

// An index signature parameter type cannot be a union type. 
// Consider using a mapped object type instead.
const winTarget: { [key: RockPaperScissors]: RockPaperScissors } = {
  Rock: "Scissors",
  Paper: "Rock",
  Scissors: "Paper",
};

また、オブジェクトが特定のキーの集まりを定義することを強制できることもポイントです。以下のように、最初に提示した Record型の例からキーRock を消してみました。するとどうなるでしょうか?

// Property 'Scissors' is missing in type '{ Rock: "Scissors"; Paper: "Rock"; }' 
// but required in type 'Hoge'.ts(2741)
const winTarget: Hoge = {
  Rock: "Scissors",
  Paper: "Rock",
  // Scissors: "Paper",
};

有益なエラーメッセージを得られていることがわかります。これはTypeScriptにおける 完全性による網羅チェックによる挙動になります(この記事では割愛)。

マップ型

マップ型はより強力な(柔軟な)型宣言が可能になります。と言うより、そもそもTypeScriptのRecord型自体がこのマップ型を利用して実装されているため、当たり前といえば当たり前かもしれません。以下がRecord型の実際の定義です。

/**
 * Construct a type with a set of properties K of type T
 */
type Record<K extends keyof any, T> = {
    [P in K]: T;
};

Record型の定義に登場した独自の構文がありますね。[P in K]: T記述された部分です。名前が示すように、これはオブジェクトのキー・値両方の型をマッピングするための方法です。具体的な記法の例を以下に紹介していきます。

type Pokemon = {
  skills: Array<string>;
  name: string;
  weekTypes: Array<string>;
};

// すべてのフィールドを省略可能にします type OptionalPokemon = {
type OptionalPokemon = { [K in keyof Pokemon]?: Pokemon[K] };
// すべてのフィールドをnull許容にします type NullablePokemon = {
type NullablePokemon = { [K in keyof Pokemon]: Pokemon[K] | null };
// すべてのフィールドを読み取り専用にします type ReadonlyPokemon = {
type ReadonlyPokemon = { readonly [K in keyof Pokemon]: Pokemon[K] };

このように柔軟に型情報を定義することが可能です。

組み込みのマップ型

上記に紹介したようなマップ型は実際の開発現場でも利用頻度が高いものが多いです。TypeScriptはこのような頻出と思われるマップ型の型定義があらかじめ定義されています。特にチーム開発ではこれらを採用していくことでObjectの型定義の可読性が上がると思うので、積極的に使っていきましょう。

// Keys 型のキーと Values 型の値を持つオブジェクト。
Record<Keys, Values>
// Object内のすべてのフィールドを省略可能と指定します。
Partial<Object> 
// Object内のすべてのフィールドを必須(省略不可)と指定します。
Required<Object> 
// Object内のすべてのフィールドを読み取り専用と指定します。
Readonly<Object> 
// 指定された Keysだけを持つ、Objectのスーパータイプを返します。
Pick<Object, Keys>

終わり

【TypeScript】過剰プロパティチェックの挙動

過剰なプロパティチェック

TypeScriptには、過剰なプロパティチェックを行う機能が存在します。まず、以下の例を見てみましょう。

type Pokemon = {
  ability?: Array<string>;
  weekType: string;
};

const zenigame: Pokemon = {
  // Type '{ abiility: string[]; weekType: string; }' is not assignable to type 'Pokemon'.
  // Object literal may only specify known properties, but 'abiility' does not exist in type 'Pokemon'.Did you mean to write 'ability'?
  abiility: ["bodyAttack", "waterGun"],
  weekType: "denki",
};

オブジェクト zenigameは型 Pokemonを期待しているので、前回の記事の通り、そのサブタイプを渡してあげればよさそうです。

ここで、私はzenigame のプロパティ名を1つ間違えてしまいました。abiility はタイポしてますね。javascriptではこういったバグよく起こりますよね。

これは型エラーになるかなぁと一瞬思うも、しかし、よく見ると型Pokemonのプロパティabilityは型が Array<string> | undefinedであるので、プロパティabilityzenigameにないことは abilityundefinedであることと同値であり、これはArray<string> | undefinedのサブタイプなので条件を満たします。

なので、タイポはしたものの zenigameはサブタイプの条件を満たしているように見えますね。なぜTypeScriptはこのバグを検知することができたのでしょうか?

この挙動こそ、過剰プロパティチェックです。オブジェクトリテラルからTypeScriptが推論を行う型に関して適用されます。フレッシュなオブジェクトリテラル型 Aを別の型 Bに割り当てる際に、Bには存在していないプロパティがAに存在している場合、TypeScript はエラーを吐きます。

仮にそのオブジェクトリテラルが型アサーションを使用しているか、変数に割り当てられているのであればこの挙動は適用されません。具体的に以下の例を見てみましょう。

過剰プロパティチェックが適用されないケース

変数に割り当てられる際の例

type Pokemon = {
  ability?: Array<string>;
  weekType: string;
};

// オブジェクトリテラル型は代入を通して通常のオブジェクト型に拡大される
const zenigame = {
  abiility: ["bodyAttack", "waterGun"],
  weekType: "denki",
};

// OK
const pokemonA: Pokemon = zenigame;

アサーションの例

type Pokemon = {
  ability?: Array<string>;
  weekType: string;
};

// OK 
const zenigame: Pokemon = {
  abiility: ["bodyAttack", "waterGun"],
  weekType: "denki",
} as Pokemon; // asによる型アサーション。オブジェクトの型がPokemonであることをTypeScriptに主張する

と言った感じで、フレッシュでないオブジェクトリテラル については過剰プロパティチェックの挙動は生まれません。

終わり。

【TypeScript】サブタイプとスーパータイプ、そして変性について

サブタイプとスーパータイプ

TypeScript上での型の間の関係についての概念である サブタイプ スーパータイプ についてです。

サブタイプ(subtype)

A、Bという2つの型があった場合に、BがAの派生型である場合、Aが要求されるところではどこでも、Bを利用することができる。

  • 配列はオブジェクトのサブタイプ
  • タプルは配列のサブタイプ
  • 数値 1 は numberのサブタイプ

スーパータイプ(supertype)

サブタイプの逆です。

A、Bという2つの型があり、BがAの上位型である場合、Bが要求されるところではどこでも、Aを安全に使うことができる。

  • オブジェクトは配列のスーパータイプ
  • 配列はタプルのスーパータイプ
  • number は 数値 1のスーパータイプ

変性とは?

ほとんどの基本型やシンプルな型(number, string, boolean...)については、なんらかの型Aが別の型Bのサブタイプであるかどうかを判別することは簡単ですね。例えば、 number | string という型があった場合にこれが string のスーパータイプであることは明らかです。

次に以下のようなオブジェクトの例を見てみます。以下のような例を考えます。

type LegacySong = {
  id?: number | string;
  name: string;
};

function deleteSongId(song: { id?: number; name: string }) {
  delete song.id;
}
const legacySong: LegacySong = {
  id: 123456,
  name: "old song",
};
//  Type 'string | number | undefined' is not assignable to type 'number | undefined'.
//  Type 'string' is not assignable to type 'number | undefined'.
deleteSongId(legacySong);

deleteSongId()が引数として期待しているオブジェクトの型と実際に渡されているとの間に問題が生じていることがわかります。

具体的に言うと、deleteSongId() は引数として期待するオブジェクトのプロパティ idnumber | undefinedであることを期待していますが、実際に呼び出し部分で渡されているlegacySongのプロパティ id は 'string | number | undefined'になっています。

TypeScriptはこのように、関数の引数やあらゆるシチュエーションにおいてオブジェクトが渡されることが期待される場合、期待される型のスーパータイプであるプロパティの型を持つ形状は渡すことができません。そしてこの性質を共変と呼びます。

そして、共変は、4種類の変性(variance)のうちの1つにすぎません。以下にその4種類の変性をまとめます。

  • 不変性(invariance)
    • Tそのものが必要
  • 共変性(covariance)
    • Tそのもの、もしくはサブタイプが必要
  • 反変性(contravariance)
    • Tそのもの、もしくはスーパータイプが必要
  • 双変性(bivariance)
    • Tそのもの、もしくはスーパータイプ、サブタイプが必要

関数の変性

関数Aが関数Bのサブタイプであるためには、以下を満たす必要があります。

  • 関数Aが関数Bと同じかそれより低いパラメーターの数を持つ。
  • 関数Aのthis型が指定されていない、または「Aのthis型がBのthis型のスーパータイプ」である。
  • 対応するそれぞれのパラメーターについて「Aのパラメーターの型 が Bのパラメーターのスーパータイプ」である。
  • 「Aの戻り値の型 が Bの戻り値のサブタイプ」である。

それぞれの構成要素(this型、パラメーターの型、戻り値の型)について、単にサブタイプでなのかな・・・と思いきやそれに準ずる要素は戻り値の型だけで、要素によって性質が反転する必要がありますね。なぜこのようなことになるのでしょうか?

以下の例で考えてみましょう。まず検証を行うために、3つのクラスを用意します。

class Pokemon {}

//DenkiPokemonはPokemonのサブタイプ
class DenkiPokemon extends Pokemon {
  electricShock() {
    console.log("電気ショック!");
  }
}

//PikachuはDenkiPokemonのサブタイプ
class Pikachu extends DenkiPokemon {
  lightning() {
    console.log("雷!");
  }
}

次に、以下ような1つの関数を引数として期待するコールバック clone()を定義します。

cloneに対してdenkiToDenkiを渡した時にエラーが起こらないことは明らかですね。じゃあ、denkiToPokemonはどうなんだと言うと、これはエラーを起こしてしまいます!😿

const clone = (f: (b: DenkiPokemon) => DenkiPokemon): void => {
  const parent = new DenkiPokemon();
  const babyDenkiPokemon = f(parent);
  babyDenkiPokemon.electricShock();
};

const denkiToDenki = (b: DenkiPokemon): DenkiPokemon => {
  return b;
};

const denkiToPokemon = (d: DenkiPokemon): Pokemon => {
  return d;
};

clone(denkiToDenki); // OK
clone(denkiToPokemon); // Argument of type '(d: DenkiPokemon) => Pokemon' is not assignable to parameter of type '(b: DenkiPokemon) => DenkiPokemon'.

clone()の処理を確認してみましょう。仮に渡す関数fがPokemonを返すとすると、処理の中で呼んでいる電気ショックをクラスPokemonは覚えていないので、実行することができないことがわかると思います。こういった理由から、TypeScriptは、渡された関数が「少なくとも」DenkiPokemonないしそのサブタイプを返すことを、コンパイル時に確認する必要があるのです。

一方で、パラメータについてはどうでしょうか。同じように確認してみます。

const clone = (f: (b: DenkiPokemon) => DenkiPokemon): void => {
  const parent = new DenkiPokemon();
  const babyDenkiPokemon = f(parent);
  babyDenkiPokemon.electricShock();
};

const pokemonToDenki = (b: Pokemon): DenkiPokemon => {
  return new DenkiPokemon();
};

const pikachuToDenki = (d: Pikachu): DenkiPokemon => {
  d.lightning();
  return new DenkiPokemon();
};

clone(pokemonToDenki); // OK
clone(pikachuToDenki); // Argument of type '(d: Pikachu) => DenkiPokemon' is not assignable to parameter of type '(b: DenkiPokemon) => DenkiPokemon'.

こちらも先程のケースと同様の考え方になります。 仮に関数のパラメータにDenkiPokemonのサブタイプであるPikachuを渡してしまうと、実際に関数がclone()の中で呼ばれる際にクラスDenkiPokemonlightning()を覚えていないのでエラーを吐くことになります。なので、TypeScriptは、渡された関数のパラメータが「少なくとも」DenkiPokemonないしそのスーパータイプを返すことを、コンパイル時に確認する必要があるのです。

これは、関数がそのパラメーターおよびthisの型に関して反変(contravariant)であることを意味します。つまり、ある関数が別の関数のサブタイプであるためには、それぞれのパラメーターおよびthisの型が、もう一方の関数で対応するものに対してスーパータイプである必要があります。

まぁ実際の現場の開発ではこのルールを覚えて実装する、なんて必要はないと思いますが、この制約が生まれる背景はしっかり抑えとくといいのかなと思いました。

※ちなみにTypeScript の関数は、それらのパラメーターおよび this の型に関して、デフォルトで共変らしいです。より安全な反変な振る舞い を選択するには、tsconfig.jsonの中で、{"strictFunctionTypes": true}フラグを有効にしてあげればOKです。

参考文献

www.oreilly.co.jp

【TypeScript】【React】【Recoil】翻訳しながらそれなりに型をつけて細々と進めていくRecoil Tutorial その4 Asynchronous Data Queries編(2)

f:id:lamechang_dev:20220213113950p:plain

本記事は、Reactの提供元であるFacebook改めMetaが開発中の新しい状態管理ライブラリである Recoil の公式チュートリアルを翻訳しつつ、TypeScriptで型付けをしながら進めていく連載の第四弾です。細々とやっていきます🙄 今回は Asynchronous Data Queries の内容について書いていきます。前回が(1)で、今回は(2)に当たります。

recoiljs.org

Concurrent Requests

If you notice in the above example, the friendsInfoQuery uses a query to get the info for each friend. But, by doing this in a loop they are essentially serialized. If the lookup is fast, maybe that's ok. If it's expensive, you can use a concurrency helper such as waitForAll to run them in parallel. This helper accepts both arrays and named objects of dependencies.


上記の例で気付くかもしれませんが、friendsInfoQuery()はQueryを使用して各友達の情報を取得します。ただし、これをループの中で実行することにより、基本的に逐次的に処理されます。探索が速い場合は、おそらくそれで問題ありません。処理に時間がかかる場合は、waitForAllなどの同時実行ヘルパーを使用してそれらを並行して実行できます。このヘルパーは、依存する配列と名前付きオブジェクトの両方を受け入れます。


なるほど、下記のコードの通りに selectorが依存している selectorFamily である useInfoQuery の配列を waitForAll() の引数として渡すことで、内部で実行される非同期処理を逐次処理ではなく並行処理として扱うことができる、ということでしょうね。

json-serverを利用していると非同期の挙動がterminal上での出力することができますが、それを利用すると並列処理が走り効率的に非同期を処理していることがわかりやすいです。

f:id:lamechang_dev:20220223162257g:plain

export const friendsInfoQuery = selector<Array<User>>({
  key: 'FriendsInfoQuery',
  get: ({get}) => {
    const {friendList} = get(currentUserInfoQuery);
    const friends = get(waitForAll(
      friendList.map(friendID => userInfoQuery(friendID))
    ));
    return friends;  },
});


You can use waitForNone to handle incremental updates to the UI with partial data


waitForNoneを使用して、部分的なデータを使用したUIの増分更新を処理できます

waitForNone は渡された依存関係の状態の Loadable オブジェクトを返します。 例えば今回の例のように依存関係にある selectorFamily userInfoQuery の配列について、並列的にそれぞれの非同期を実行しPromiseが解決したものから部分的にUIを更新する、といったような挙動を以下のようなコードで実現することができるみたいです。

ちなみに、Loadable の詳細はこちらLoadable オブジェクトはatom もしくは selectorの現在の状態を表現しており使用可能な値があるか、エラー状態にあるか、非同期解決が保留されている可能性があります。これらはそれぞれhasValuehasError、または loadingで表現されます。

以下の例の friendsInfoQueryreturn部分を見ると、取得した friendsのうち statehasValueであるもののみにfilterをしていることがわかります。

const friendsInfoQuery = selector({
  key: 'FriendsInfoQuery',
  get: ({get}) => {
    const {friendList} = get(currentUserInfoQuery);
    const friendLoadables = get(waitForNone(
      friendList.map(friendID => userInfoQuery(friendID))
    ));
    return friendLoadables
      .filter(({state}) => state === 'hasValue')
      .map(({contents}) => contents);
  },
});

Pre-Fetching

For performance reasons you may wish to kick off fetching before rendering. That way the query can be going while we start rendering. The React docs give some examples. This pattern works with Recoil as well.


パフォーマンス上の理由から、レンダリングの前にフェッチを開始したいと考えるかもしれません。そうすれば、レンダリングを開始するときにクエリを実行できます。 Reactのドキュメントにはいくつかの例があります。このパターンはリコイルでも機能します。


Let's change the above example to initiate a fetch for the next user info as soon as the user clicks the button to change users:


上記の例を変更して、ユーザーがボタンをクリックしてユーザーを変更するとすぐに、次のユーザー情報のフェッチを開始しましょう。

これ、突然 useRecoilCallback が登場してきてるので、そちらの挙動の確認をした方がいいでしょう。

さてuseRecoilCallbackですが、こちらは subscribeさせずに atomもしくは selector を読み込んで何かをする、という時に利用されると考えます。subscribeによる状態管理は、値の変更を常に応じて状態を常に更新する必要が出てきてしまいますが、下記の例のように onClickが走った時のみに値を取得し、再レンダリングを行いたい、といったことを実現することができます。

const CurrentUserInfo: React.VFC = () => {
  const currentUser = useRecoilValue(currentUserInfoQuery);
  const friends = useRecoilValue(friendsInfoQuery);

  const changeUser = useRecoilCallback<Array<number>, void>(({snapshot, set}) => userID => {
    snapshot.getLoadable(userInfoQuery(userID)); // pre-fetch user info
    set(currentUserIDState, userID); // change current user to start new render
  });

  return (
    <div>
      <h1>{currentUser.name}</h1>
      <ul>
        {friends.map(friend =>
          <li key={friend.id} onClick={() => changeUser(friend.id)}>
            {friend.name}
          </li>
        )}
      </ul>
    </div>
  )};

export default CurrentUserInfo;


Note that this pre-fetching works by triggering the selectorFamily() to initiate an async query and populate the selector's cache. If you are using an atomFamily() instead, by either setting the atoms or relying on atom effects to initialize, then you should use useRecoilTransaction_UNSTABLE() instead of useRecoilCallback(), as trying to set the state of the provided Snapshot will have no effect on the live state in the host .


このプリフェッチは、selectorfamily()による非同期クエリの実行と、selectorのキャッシュを入することによって機能します。代わりにatomFamily()を使用している場合は、Atomを設定したり、atoms effectsによる初期化を利用することで、userecoilCallback()の代わりにuseRecoilTransaction_UNSTABLE()を使用してください。提供されたSnapshotのstateを設定しようとしても、RecoilRootのstateには影響しません。


Asynchronous Data Queries の部分は新しい情報がモリモリですね。Query Default Atom Values以降については更に記事を分けて、(3)としたいと思います。

【TypeScript】【React】【Recoil】翻訳しながらそれなりに型をつけて細々と進めていくRecoil Tutorial その3 Asynchronous Data Queries編(1)

f:id:lamechang_dev:20220213113950p:plain

本記事は、Reactの提供元であるFacebook改めMetaが開発中の新しい状態管理ライブラリである Recoil の公式チュートリアルを翻訳しつつ、TypeScriptで型付けをしながら進めていく連載の第三弾です。細々とやっていきます🙄 今回は Asynchronous Data Queries について。

recoiljs.org

Asynchronous Data Queries

Recoil provides a way to map state and derived state to React components via a data-flow graph. What's really powerful is that the functions in the graph can also be asynchronous. This makes it easy to use asynchronous functions in synchronous React component render functions. Recoil allows you to seamlessly mix synchronous and asynchronous functions in your data-flow graph of selectors. Simply return a Promise to a value instead of the value itself from a selector get callback, the interface remains exactly the same. Because these are just selectors, other selectors can also depend on them to further transform the data.

Selectors can be used as one way to incorporate asynchronous data into the Recoil data-flow graph. Please keep in mind that selectors represent "idempotent" functions: For a given set of inputs they should always produce the same results (at least for the lifetime of the application). This is important as selector evaluations may be cached, restarted, or executed multiple times. Because of this, selectors are generally a good way to model read-only DB queries. For mutable data you can use a Query Refresh or to synchronize mutable state, persist state, or for other side-effects consider the experimental Atom Effects API.


Recoilは、データフローグラフを介して状態と派生状態をReactコンポーネントマッピングする方法を提供します。本当に強力なのは、グラフの関数も非同期にできることです。これにより、同期Reactコンポーネントレンダリング関数で非同期関数を簡単に使用できるようになります。 Recoilを使用すると、セレクターのデータフローグラフで同期関数と非同期関数をシームレスに組み合わせることができます。セレクターの getコールバックから値自体ではなく、Promiseを値に返すだけで、インターフェースはまったく同じままになります。これらは単なるセレクターであるため、他のセレクターもデータをさらに変換するためにそれらに依存することができます

セレクタは、非同期データをRecoilデータフローグラフに組み込む1つの方法として使用できます。セレクタは idempotent(べき等) 関数を表すことを心に留めておいてください。特定の入力のセットの場合、それらは常に同じ結果(少なくともアプリケーションの有効期間)を生成する必要があります。セレクタ評価がキャッシュ、再起動、または複数回実行される可能性があるため、これは重要です。このため、セレクタは一般的に読み取り専用DBクエリをモデル化するための良い方法です。可変データの場合、クエリの更新を使用するか、可変状態を同期させることができます。

Synchronous Example

For example, here is a simple synchronous atom and selector to get a user name:


たとえば、これはユーザー名を取得するための単純なAtomSelectorです。


これは、非同期を含まない非常に単純な例ですネ。サンプルコードでは非同期を挟まないローカルデータが存在することを意図して記述されていたので、簡単なオブジェクトだけ追加して動作を確認しました。

// サンプルコードから追加
const tableOfUsers = [
  {
    name: "Jane",
  },
  {
    name: "Mike",
  },
];

// 以下は変更なし
const currentUserIDState = atom({
  key: "CurrentUserID",
  default: 1,
});

export const currentUserNameState = selector({
  key: "CurrentUserName",
  get: ({ get }) => {
    return tableOfUsers[get(currentUserIDState)].name;
  },
});

const CurrentUserInfo: React.VFC = () => {
  const userName = useRecoilValue(currentUserNameState);
  return <div>{userName}</div>;
};

export default CurrentUserInfo;

Asynchronous Example

If the user names were stored in some database we need to query, all we need to do is return a Promise or use an async function. If any dependencies change, the selector will be re-evaluated and execute a new query. The results are cached, so the query will only execute once per unique input.


ユーザー名がQueryを実行する必要があるDBに保存されている場合は、やることはPromiseを返すか、非同期を使用することだけです。依存関係が変更された場合、セレクタは再評価され、新しいクエリを実行します。結果がキャッシュされるため、Queryは一意の入力ごとに1回だけ実行されます。


実際のドキュメントでは、Promiseを返す myDBQuery()について特に具体例などがあげられていないので、json-serverを使うなどして簡易的なエンドポイントを作ればいいかと思います。一応、json-serverを利用して書いた myDBQuery()側のコードについても載せておきます。

// 特に変更点なし

export const currentUserNameQuery = selector({
  key: "CurrentUserName",
  get: async ({ get }) => {
    const response = await myDBQuery({
      userID: get(currentUserIDState),
    });
    return response.name;
  },
});
// myDBQuery

import axios from "axios";

export const BASE_URL = "http://localhost:3001";

export const apiClient = axios.create({
  baseURL: BASE_URL,
  headers: {
    "Content-Type": "application/json",
  },
});

export type User = {
  id: number;
  name: string;
};

export const myDBQuery = async ({
  userID,
}: {
  userID: User["id"];
}): Promise<User> => {
  return apiClient
    .get<User>(`/users/${userID}`)
    .then((res) => res.data);
};
// json-serverで利用するJSON
// json-server --p 3001 --delay 1000 --watch path/to/xx.json
{
  "users": [
    {
      "id": 1,
      "name": "Jane"
    },
    {
      "id": 2,
      "name": "Mike"
    },
    {
      "id": 3,
      "name": "Cathy"
    }
  ]
}


The interface of the selector is the same, so the component using this selector doesn't need to care if it was backed with synchronous atom state, derived selector state, or asynchronous queries!


Selectorのインターフェースは同じであるため、このSelectorを使用したコンポーネントは、値が Atom か Selector、または非同期Queryで返されているかどうかなどを気にする必要がありません!


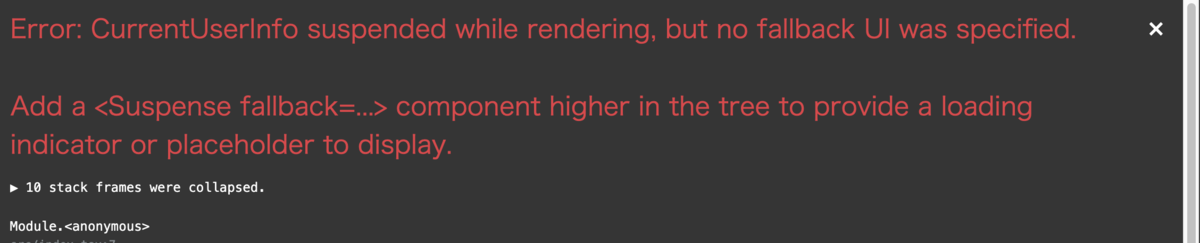
But, since React render functions are synchronous, what will it render before the promise resolves? Recoil is designed to work with React Suspense to handle pending data. Wrapping your component with a Suspense boundary will catch any descendants that are still pending and render a fallback UI:


しかし、ReactのRender関数は同期処理なので、Promiseが解決する前に何がレンダリングされるのでしょうか。Recoilは、Pendingデータを処理するために React Susenseで動作するように設計されています。Suspense boundaryコンポーネントをWrapすると、まだ保留中の子コンポーネントがキャッチされ、フォールバックUIをレンダリングします。

ここは実際にコードを書く際に、 <React.Suspense> をはずしてみて画面を読み込む際に何が起きるか、を見るのが一番わかりやすいと思います。以下のように「Suspense状態なのにfallback UIが指定されてないから<Suspense>コンポーネント使って指定してね」と怒られます。

f:id:lamechang_dev:20220211132126p:plain

<React.Suspense>コンポーネントを囲ってあげると、Promiseが解決されるのを待機している状態では以下のような挙動になります。

f:id:lamechang_dev:20220212130622g:plain


const App: React.FC = () => {
  return (
    <RecoilRoot>
       // React.Suspenseを外すとエラーになる
      <React.Suspense fallback={<div>Loading...</div>}>
        <CurrentUserInfo />
      </React.Suspense>
    </RecoilRoot>
  );
};
export default App;

Error Handling

But what if the request has an error? Recoil selectors can also throw errors which will then be thrown if a component tries to use that value. This can be caught with a React . For example:


しかし、リクエストにエラーがある場合はどうなりますか?RecoilのSelectorはまた、コンポーネントがその値を使用しようとしている場合にスローされるエラーをスローすることもできます。これはコンポーネント <ErrorBoundary>で捉えることができます。例えば

const currentUserNameQuery = selector({
  key: 'CurrentUserName',
  get: async ({get}) => {
    const response = await myDBQuery({
      userID: get(currentUserIDState),
    });
    if (response.error) {
      throw response.error;
    }
    return response.name;
  },
});

function CurrentUserInfo() {
  const userName = useRecoilValue(currentUserNameQuery);
  return <div>{userName}</div>;
}

function MyApp() {
  return (
    <RecoilRoot>
      <ErrorBoundary>
        <React.Suspense fallback={<div>Loading...</div>}>
          <CurrentUserInfo />
        </React.Suspense>
      </ErrorBoundary>
    </RecoilRoot>
  );
}

Recoil側のリファレンスでError Boundary についての詳細の説明がないのでこの記事においても詳細は省きますが、以下のような Error Boundary コンポーネントを用意して上記の例のようにWrapした上で、selectorの中でPromiseの解決に問題が発生した際などにErrorをthrowをすると、以下のような画面を表示することができます。

これは「クラッシュした UI を表示させる代わりに、フォールバック用の UI を表示するコンポーネントを準備して見せた方がユーザから見るとマシだよね」、といった感じですよね。

import React, { Component, ErrorInfo, ReactNode } from "react";

interface Props {
  children: ReactNode;
}

interface State {
  hasError: boolean;
}

class ErrorBoundary extends Component<Props, State> {
  public state: State = {
    hasError: false
  };

  public static getDerivedStateFromError(_: Error): State {
    // Update state so the next render will show the fallback UI.
    return { hasError: true };
  }

  public componentDidCatch(error: Error, errorInfo: ErrorInfo) {
    console.error("Uncaught error:", error, errorInfo);
  }

  public render() {
    if (this.state.hasError) {
      return <h1>Sorry.. there was an error</h1>;
    }

    return this.props.children;
  }
}

export default ErrorBoundary;

f:id:lamechang_dev:20220212124540p:plain

Queries with Parameters

Sometimes you want to be able to query based on parameters that aren't just based on derived state. For example, you may want to query based on the component props. You can do that using the selectorFamily helper:


派生状態に純粋に基づいていないパラメータに基づいてクエリしたい場面があるでしょう。たとえば、コンポーネントのPropsに基づいてQueryしたい時が出てくるでしょう。selectorFamilyヘルパーを使用してそれをすることができます。


このatomFamilyselectorFamily の概念は実際の現場ではかなり重宝する印象です。というのも

仮に「id=”1″ のUserの情報」を表示して「id=”2″のUserの情報」に切り替えたい時に、もしatomだけを愚直に使うなら、切り替える際にatomの状態をいったんクリアするような処理が必要となってしまいますが、そのようなことはする必要なくなりますね。

型を定義する上でのポイントとしては、selectorFamilyは型引数を2つ受け付けるようになっていて、1つ目については selector と完全に同じものですが、2つ目については get()で利用するパラメータに対して型を付けることができます。

export const userNameQuery = selectorFamily<string, number>({
  key: 'UserName',
  get: userID => async () => {
    const response = await myDBQuery({ userID });
    if ("isAxiosError" in response)
    {
      throw response.message
    }
    return response.name;
  },
});
const UserInfo: React.VFC<{ userID: number }> = ({ userID }) => {
  // 引数を受け付ける
  const userName = useRecoilValue(userNameQuery(userID));
  return <div>{userName}</div>;
}

export default UserInfo
const App: React.VFC = () => {
  return (
    <RecoilRoot>
      <ErrorBoundary>
        <React.Suspense fallback={<div>Loading...</div>}>
          <UserInfo userID={1}/>
          <UserInfo userID={2}/>
          <UserInfo userID={3} />
        </React.Suspense>
      </ErrorBoundary>
    </RecoilRoot>
  );
};
export default App;

Data-Flow Graph

Remember, by modeling queries as selectors, we can build a data-flow graph mixing state, derived state, and queries! This graph will automatically update and re-render React components as state is updated.


SelectorとしてQueryをモデル化することで、データフローグラフのミックスされた状態、派生状態、およびクエリを構築できます。このグラフは自動的にReact Componentを更新して更新して再レンダリングします。


The following example will render the current user's name and a list of their friends. If a friend's name is clicked on, they will become the current user and the name and list will be automatically updated.


次の例では、現在のユーザーの名前とその友達のリストを表示します。友達の名前をクリックすると、その友達が現在のユーザーになり、名前とリストが自動的に更新されます。

コードを読むと気づくことですが、各 UserfriendList を持つことを想定しているようなので、 型 Userを以下のように調整してあげましょう。

export type User = {
  id: number;
  name: string;
  // friendListを追加
  friendList: Array<User["id"]>
};

その上でチュートリアルのコードを型をつけて書いていくと以下のようになります。やはり、型引数のおかげで各 selector の挙動の見通しがかなり分かりやすいですね。

export const currentUserIDState = atom({
  key: "CurrentUserID",
  default: 1,
});

export const userInfoQuery = selectorFamily<User, number>({
  key: 'UserInfoQuery',
  get: userID => async () => {
    const response = await myDBQuery({userID});
    if ("isAxiosError" in response) {
      throw response.message;
    }
    return response;
  },
});

export const currentUserInfoQuery = selector<User>({
  key: 'CurrentUserInfoQuery',
  get: ({get}) => get(userInfoQuery(get(currentUserIDState))),
});

export const friendsInfoQuery = selector<Array<User>>({
  key: 'FriendsInfoQuery',
  get: ({get}) => {
    const {friendList} = get(currentUserInfoQuery);
    return friendList.map(friendID => get(userInfoQuery(friendID)));
  },
});
import { useRecoilValue, useSetRecoilState } from "recoil";
import { currentUserInfoQuery, friendsInfoQuery, currentUserIDState } from "../../Global/User";

const CurrentUserInfo: React.VFC = () => {
  const currentUser = useRecoilValue(currentUserInfoQuery);
  const friends = useRecoilValue(friendsInfoQuery);
  const setCurrentUserID = useSetRecoilState(currentUserIDState);
 return (
    <div>
      <h1>{currentUser.name}</h1>
      <ul>
        {friends.map(friend =>
          <li key={friend.id} onClick={() => setCurrentUserID(friend.id)}>
            {friend.name}
          </li>
        )}
      </ul>
    </div>
  );};

export default CurrentUserInfo;

記事が長くなりそうなので、Concurrent Requests 以降については別の記事として切り出そうと思います。Reactのdocは全般的に翻訳しようとするとルー大柴現象が起きますね。

【TypeScript】【React】【Recoil】翻訳しながらそれなりに型をつけて細々と進めていくRecoil Tutorial その2 Selector編

f:id:lamechang_dev:20220213113823p:plain

本記事は、Reactの提供元であるFacebook改めMetaが開発中の新しい状態管理ライブラリである Recoil の公式チュートリアルを翻訳しつつ、TypeScriptで型付けをしながら進めていく連載の第二弾です。細々とやっていきます🙄 今回は Selector について。

recoiljs.org

Selector

A selector represents a piece of derived state. You can think of derived state as the output of passing state to a pure function that modifies the given state in some way.

Derived state is a powerful concept because it lets us build dynamic data that depends on other data. In the context of our todo list application, the following are considered derived state:

Filtered todo list: derived from the complete todo list by creating a new list that has certain items filtered out based on some criteria (such as filtering out items that are already completed).

Todo list statistics: derived from the complete todo list by calculating useful attributes of the list, such as the total number of items in the list, the number of completed items, and the percentage of items that are completed.

To implement a filtered todo list, we need to choose a set of filter criteria whose value can be saved in an atom. The filter options we'll use are: "Show All", "Show Completed", and "Show Uncompleted". The default value will be "Show All":


セレクターは、派生状態の一部を表します。派生状態は、特定の状態を何らかの方法で変更する純粋関数に状態を渡す出力と考えることができます。

派生状態は、他のデータに依存する動的データを構築できるため、強力な概念です。 ToDoリストアプリケーションのコンテキストでは、以下は派生状態と見なされます。

フィルタリングされたToDoリスト: いくつかの基準に基づいて特定のアイテムが除外された新しいリストを作成することにより、完全なToDoリストから派生します(すでに完了しているアイテムを除外するなど)。

ToDoリストの統計:リスト内のアイテムの総数、完了したアイテムの数、完了したアイテムの割合など、リストの有用な属性を計算することにより、完全なToDoリストから導出されます。

フィルター処理されたToDoリストを実装するには、値をアトムに保存できるフィルター基準のセットを選択する必要があります。使用するフィルターオプションは、「すべて表示」、「完了済みを表示」、「未完了を表示」です。デフォルト値は「すべて表示」になります。

「すべて表示」、「完了済みを表示」、「未完了を表示」がフィルターオプションになるとのことなので、それらの条件を文字列リテラルのユニオンで定義してあげようと思います。すると、コードは以下のようになるかと思います。

export type TodoListFilterType =
  | "Show All"
  | "Show Completed"
  | "Show Uncompleted";

export const todoListFilterState = atom<TodoListFilterType>({
  key: "todoListFilterState",
  default: "Show All",
});


Using todoListFilterState and todoListState, we can build a filteredTodoListState selector which derives a filtered list:


todoListFilterStateとtodoListStateを使用して、フィルターされたリストを導出するfilteredTodoListState Selectorを構築できます。

selectorは以下のようなコードになります。ここで前回のatomの時と同様に、selector が保持する型を明らかにするためにジェネリクスを使っています。

またtodoListFilterStateの型を文字列リテラルで指定したため、switch文で利用しているcaseに意図しない文字列リテラルが含まれるとエラーを吐くようになることで安全に記述できています。

const filteredTodoListState = selector<Todo[]>({
  key: "filteredTodoListState",
  get: ({ get }) => {
    const filter = get(todoListFilterState);
    const list = get(todoListState);

    switch (filter) {
      case "Show Completed":
        return list.filter((item) => item.isComplete);
      case "Show Uncompleted":
        return list.filter((item) => !item.isComplete);
      default:
        return list;
    }
  },
});


The filteredTodoListState internally keeps track of two dependencies: todoListFilterState and todoListState so that it re-runs if either of those change.


filteredTodoListStateは、todoListFilterStateとtodoListStateの2つの依存関係を内部的に追跡し、これらのいずれかが変更された場合に再実行されるようにします。


From a component's point of view, selectors can be read using the same hooks that are used to read atoms. However it's important to note that certain hooks only work with writable state (i.e useRecoilState()). All atoms are writable state, but only some selectors are considered writable state (selectors that have both a get and set property). See the Core Concepts page for more information on this topic.


Componentの観点からは、Atomの読み取りに使用されるのと同じフックを使用してセレクターを読み取ることができます。ただし、特定のフックは書き込み可能な状態(つまり、useRecoilState())でのみ機能することに注意することが重要です。すべてのアトムは書き込み可能な状態ですが、一部のSelectorのみが書き込み可能な状態と見なされます(getプロパティとsetプロパティの両方を持つセレクター)。このトピックの詳細については、「コアコンセプト」ページを参照してください。

ここの部分、つまるところSelector には2通りの形式があって、一部は書き込み可能な状態と扱われてそれ以外はそうならない、ということになります。これは selector()の型定義を見ると分かりやすかったです。以下のように2種類の型定義が存在し、RecoilValueReadOnly<T> を返すケース(getプロパティのみを持つケース)が今回定義したtodoListFilterState に該当します。

export function selector<T>(options: ReadWriteSelectorOptions<T>): RecoilState<T>;
export function selector<T>(options: ReadOnlySelectorOptions<T>): RecoilValueReadOnly<T>;


Displaying our filtered todoList is as simple as changing one line in the TodoList component:


フィルタリングされたtodoListの表示は、TodoListコンポーネントの1行を変更するのと同じくらい簡単です。

ふむふむ、といった感じです。Vueを書いたことがある人なら、selectorのコンセプトはVueのcomputedにそっくりだと感じると思います。

const TodoList: React.VFC = () => {
  // changed from todoListState to filteredTodoListState
  const todoList = useRecoilValue(filteredTodoListState);

  return (
    <>
      <TodoItemCreator />
      {todoList.map((todoItem) => (
        <TodoItem key={todoItem.id} item={todoItem} />
      ))}
    </>
  );
};


Note the UI is showing every todo because todoListFilterState was given a default value of "Show All". In order to change the filter, we need to implement the TodoListFilters component:


todoListFilterStateにはデフォルト値の「ShowAll」が指定されているため、UIにはすべてのtodoが表示されていることに注意してください。フィルタを変更するには、TodoListFiltersコンポーネントを実装する必要があります。

const TodoListFilters: React.VFC = () => {
  const [filter, setFilter] = useRecoilState(todoListFilterState);

  const updateFilter = (e: ChangeEvent<HTMLSelectElement>) => {
    setFilter(e.target.value as TodoListFilterType);
  };

  return (
    <>
      Filter:
      <select value={filter} onChange={updateFilter}>
        <option value="Show All">All</option>
        <option value="Show Completed">Completed</option>
        <option value="Show Uncompleted">Uncompleted</option>
      </select>
    </>
  );
};

ここまでの実装で、以下のような画面になります。フィルタリング機能が追加されましたね。

f:id:lamechang_dev:20220205181238p:plain


With a few lines of code we've managed to implement filtering! We'll use the same concepts to implement the TodoListStats component.

We want to display the following stats:

・Total number of todo items
・Total number of completed items
・Total number of uncompleted items
・Percentage of items completed

While we could create a selector for each of the stats, an easier approach would be to create one selector that returns an object containing the data we need. We'll call this selector todoListStatsState:


いくつかのコードを使用して、フィルタリングを実装することができました! ToDoListStatsコンポーネントを実装するために同じ概念を使用します。

次の統計を表示したいと思います。

・TODOアイテムの総数
・完成したアイテムの総数
・完成していないアイテムの総数
・完了したアイテムの割合

統計ごとにセレクターを作成することもできますが、より簡単な方法は、必要なデータを含むオブジェクトを返す1つのセレクターを作成することです。このセレクターをtodoListStatsStateと呼びます。

ここは特筆すべきところはないですが、こういった類の統計値を使いたい場合は、依存先が共通であるのであれば同じ selector の中でまとめて返してあげることもできるよ、といったところですかね・・

const todoListStatsState = selector<{
  totalNum: number;
  totalCompletedNum: number;
  totalUncompletedNum: number;
  percentCompleted: number;
}>({
  key: "todoListStatsState",
  get: ({ get }) => {
    const todoList = get(todoListState);
    const totalNum = todoList.length;
    const totalCompletedNum = todoList.filter((item) => item.isComplete).length;
    const totalUncompletedNum = totalNum - totalCompletedNum;
    const percentCompleted =
      totalNum === 0 ? 0 : (totalCompletedNum / totalNum) * 100;

    return {
      totalNum,
      totalCompletedNum,
      totalUncompletedNum,
      percentCompleted,
    };
  },
});


To read the value of todoListStatsState, we use useRecoilValue() once again:


TodoListStatSstateの値を読むには、userecoilValue()をもう一度使用します。

const TodoListStats: React.VFC = () => {
  const { totalNum, totalCompletedNum, totalUncompletedNum, percentCompleted } =
    useRecoilValue(todoListStatsState);

  const formattedPercentCompleted = Math.round(percentCompleted);

  return (
    <ul>
      <li>Total items: {totalNum}</li>
      <li>Items completed: {totalCompletedNum}</li>
      <li>Items not completed: {totalUncompletedNum}</li>
      <li>Percent completed: {formattedPercentCompleted}</li>
    </ul>
  );
};

以上までの実装を完了させると、Todoリストは以下のようになります。

f:id:lamechang_dev:20220205181605p:plain

ここまでの実装はまさにRecoilのコアコンセプトといったところでしょうか。Reduxなどと比べるとそもそものコード記述量も少なく、かつ簡潔に記述できているな、といったのが率直な印象です。

さて、次回は Asynchronous Data Queries について書こうかと思います。